Reviews


-
Biolytic
- Mar 13, 2026 Creating an Automated Notification and Approval System for Cross-functional, Collaborative Efficiency Using Microsoft Power Automate Mar 13, 2026
- Apr 8, 2021 Conditionally Display Microsoft Flow Activating Buttons in Sharepoint Libraries Using Column Formatting Apr 8, 2021
- Apr 7, 2021 Create a Self-Sustaining, Expiring Document Sharing System Using Sharepoint and Microsoft Flow Apr 7, 2021
-
Grad School
- Aug 17, 2022 CS-7646 | Machine Learning for Trading (ML4T) | Summer 2022 Aug 17, 2022
- May 9, 2022 CS-7638 | Robotics: AI Techniques (RAIT) | Spring 2022 May 9, 2022
- May 3, 2022 Georgia Institute of Technology May 3, 2022
-
Misc
- Dec 16, 2025 J R L - Stow Lake 2025 Dec 16, 2025
- Nov 2, 2025 LHCE - Home Studio 2025 Nov 2, 2025
- Jan 29, 2025 L+H+C at Palace of Fine Arts Jan 29, 2025
- Nov 27, 2023 FAN EXPO San Francisco 2023 Nov 27, 2023
-
Reviews
- Apr 15, 2021 Product Review | Winter 2020 Apr 15, 2021
- Dec 1, 2020 Product Review | Fall 2020 Dec 1, 2020
- Sep 18, 2020 Product Review | Summer 2020 Sep 18, 2020
-
Tech Tutorials and Project Write Ups
- Mar 13, 2026 Creating an Automated Notification and Approval System for Cross-functional, Collaborative Efficiency Using Microsoft Power Automate Mar 13, 2026
- Mar 28, 2025 Setting up a Final Cut Pro Project 2025 Mar 28, 2025
- Apr 8, 2021 Conditionally Display Microsoft Flow Activating Buttons in Sharepoint Libraries Using Column Formatting Apr 8, 2021
- Apr 7, 2021 Create a Self-Sustaining, Expiring Document Sharing System Using Sharepoint and Microsoft Flow Apr 7, 2021
-
Travel
- Jan 6, 2026 Vietnam 2025 Jan 6, 2026
- Jul 30, 2025 London 2025 Jul 30, 2025
- Jul 29, 2025 Paris 2025 Jul 29, 2025
- Jul 29, 2025 Milan 2025 Jul 29, 2025
- Jul 29, 2025 Rome 2025 Jul 29, 2025
- Jan 12, 2025 Big Island 2025 Day 2 Jan 12, 2025
- Jan 12, 2025 Big Island 2025 Day 1 Jan 12, 2025
- Jan 12, 2025 Oahu December 2024 Jan 12, 2025
- Jul 27, 2024 Mt. Rainier 2024 Jul 27, 2024
- Jul 27, 2024 Seattle 2024 Jul 27, 2024
- Jun 25, 2024 Oahu June 2024 Jun 25, 2024
- Jan 6, 2024 Oahu 2023 | Day 5, 6, 7, 8 Jan 6, 2024
- Jan 6, 2024 Oahu 2023 | Day 4 Jan 6, 2024
- Jan 6, 2024 Oahu 2023 | Day 3 Jan 6, 2024
- Jan 6, 2024 Oahu 2023 | Day 1 & 2 Jan 6, 2024
- Aug 8, 2023 Olympic National Park 2023 | Day 3 Aug 8, 2023
- Aug 8, 2023 Olympic National Park 2023 | Day 1 & 2 Aug 8, 2023
- Jan 7, 2023 Las Vegas 2023 Jan 7, 2023
- Nov 24, 2022 Disneyland 2022 - Day 2 Nov 24, 2022
- Nov 24, 2022 Disneyland 2022 - Day 1 Nov 24, 2022
- Aug 22, 2022 Sequoia and Kings Canyon National Park Aug 22, 2022
- Jul 14, 2022 Seattle 2022 Jul 14, 2022
- Jun 1, 2022 Mount Rainier National Park Jun 1, 2022
- Apr 26, 2022 Coachella 2022 Apr 26, 2022
- Nov 20, 2021 Joshua Tree National Park Nov 20, 2021
Create a Self-Sustaining, Expiring Document Sharing System Using Sharepoint and Microsoft Flow
Image from sodapdf.comIntroduction
Who knew sharing documents could get so complicated. Sharing documents is typically a straight forward process, but it can get tricky in situations involving authenticated vs unauthenticated users, or privacy settings. The latter was the case at my company where sharing sensitive documents to customers outside our organization was commonplace.
In this post, I go over my process in creating an automated document sharing system to address specific company concerns regarding sharing documents. This system uses Microsoft Sharepoint and Microsoft Flow (now called Power Automate). This post is written as a project log / tutorial hybrid. I hope you can learn from my experience and maybe even implement some of the Flows from this post in your own automated workflow.
Definitions

Microsoft Sharepoint:
SharePoint is a web-based collaborative platform that integrates with Microsoft Office. Launched in 2001, SharePoint is primarily sold as a document management and storage system, but the product is highly configurable and usage varies substantially among organizations.

Microsoft Flow:
A process and task automation tool that uses low-code / no-code to help connect different applications and services together.
Defining The Problem
My company sends Sharepoint documents such as product manuals, data sheets, and brochures to our customers using a public sharing link with an expiration date. Sharepoint allows a single public sharing link to be used per document at a time. Problems arise when sharing documents that are already embedded on our website using public sharing links. Creating new sharing links with expiration dates for these documents overwrite existing public links, breaking all previously available links on our website.
The core problem we needed to solve was finding or creating a system that would allow us to share documents with our
customers without breaking links on our website.
Solution Ideation
My initial thought in solving this issue was to create a separate Document Library where users can place copies of the document they wanted to share. Users would be able to place expiration dates on these document copies without disrupting any links the original document may have had.
This iteration of a solution could solve our initial problem. Users would be able to share documents to customers without disrupting already existing links, but would result in a bloated company document library with multiple copies of files laying around, which would be confusing to version control. This iteration would also need a person to manually clean up expired documents which would introduce human labor and error.
After researching Microsoft Flow / Power Automate, I figured I could use Flows to build upon the solution above to create an automated workflow that would address the bloat and human error issues while improving the user experience.
This system uses three separate Microsoft Flows to**:
Create a copy of a specific document
Append user initials and date of expiration to generate a unique document ID
Convert a list of file extensions to PDF
Move the document to a separate document library
Create an expiring shareable link
Send an email and Microsoft Team’s notification to the user with the shareable link
Finally delete the document after it expires
**Note that this post was written after completion of a full working prototype. The list above contains the final features of the working prototype that were implemented after user testing and feedback. More about this in the section below titled ‘Testing and Evaluation’.
Solution Implementation
Creating The Document Library
The first step in implementing the solution is to create a separate Document Library on Sharepoint where copies of our documents-to-be-shared would live, and eventually die. You can create the Document Library anywhere in your organization and name it whatever you like. After creating the document library, the next step is implementing automation using Microsoft Flow.
Flow One: Delete Files After X Days
The function of the first flow is cleaning up, or deleting files that are older than X days. This flow activates every day, looping through the expiring document library, checking each file, and applying actions depending on the status of the condition.

The architecture of this flow is simple, with three main actions. This flow is set to trigger once a day, loops through your document library, and applies a condition check to each file.
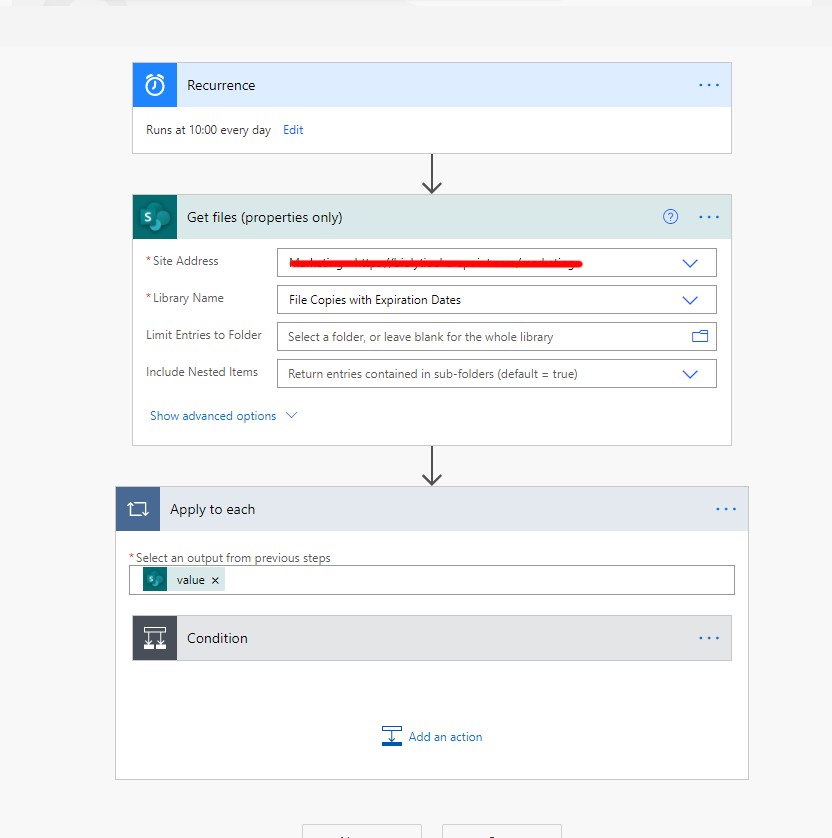
The flow has a Recurrence Trigger that is set to run at 10:00 AM every day. You can set this to whatever time you like, but a daily trigger is used because we are concerned with the age of the documents in units of Days.
The flow uses a Get files (property only) action which requires the site address for your organization, as well as the specific document library we created where all the expiring documents will live. This action allows us to capture information about each file, which we will feed into the condition check.

An Apply to each action loops through each individual file in your document library. This action checks the condition of whether the document is older than X amount of days. If it passes the condition, the document is deleted using a Delete item Action. The item is ignored if it does not pass the condition.
The variables used in the condition are:
utcNow(), returns the current time and date
addDays(), returns the result of a specified time, added with a specified amount of days. In our case, I used the date at which the document was created, added with 7 days. Raw Input: addDays(items('Apply_to_each')?['Created'],7).
The condition checks if the current date and time is greater than the date and time the file was created plus 7 days. If the condition passes, it means the document is older than 7 days and will be deleted using the Delete Item action.
Flow Two: Rename File and Create a Sharing Link
After creating a separate document library where copied files would live, and implementing a Flow that deletes expired files, the next flow created will generate the actual shareable expiration link, as well as rename incoming files with a unique name to prevent confusing duplicates.


The trigger used for this flow is When a file is created. This triggers when a user copies over a file into our created document library.
The next action Get file properties gets meta information about the newly created file that we will use in the flow.

The next set of actions is added in to detect and clean up special characters in file names. In our user testing, we discovered that file names with a period (.) in it would cause the flow to fail during the renaming step.
I initialized three variables. The first variable holds the string name of the file we are cleaning up. The second variable is a Temp variable that will be used in the flow. The third variable is an array of special characters we want to clean up. You can edit this array to contain whatever characters you want to clean up.
createArray('.','@','ß','²','³','µ','`','´','°','^','=','(',')','&','$','§', '~','#','%','*',':','<','>','?','/','|')

The Temp variable will be set with the replace variable which will remove all special characters from our file name stored in Sanitize.
replace(variables('Sanitize'), item(), '')
The file name variable Sanitize will be updated to have the same value as the Temp variable we just cleaned.

A new variable containing our new file name will be created next, using the sanitized file name, and appending to it the initials of the user, calculated using the substring variable, as well as the expiration date.
First Initial:
substring(first(split(outputs('Get_file_properties')?['body/Author/DisplayName'],' ')),0,1)
Last Initial
substring(last(split(outputs('Get_file_properties')?['body/Author/DisplayName'],' ')),0,1)
Date of expiration
addDays(outputs('Get_file_properties')?['body/Created'],7,'yyyy-MM-dd-hhmmsstt')

Now that we have a variable that contains a cleaned and unique file name, the next step is to change the file name to this variable value. Microsoft Flow does not contain any built-in Sharepoint connectors that easily change file names.
To change the file name of a Sharepoint file using Flow, we must change the file’s FileLeafRef metadata field. We do this with a HTTP POST request. To get the correct type to use in the Body of the request, follow the uri in your browser using your site address and document library. This will return a bunch of JSON code that you will need to parse out to get the correct type.
Input the new file name variable in the Body of the request as seen in the screenshot.

After changing your file’s name, the next step is to generate the expiring sharing link. This can be done using the Create sharing link for a file or folder action. This flow can also be used to generate regular shareable links by changing the Link Type and Link Scope.
I initialized a variable CompleteLink that contains an <a> tag that directs to the document with a display text of the File name to make the next step of sending Emails and Microsoft Teams messages cleaner.

The final step for this flow would be sending yourself a link of the new expiring shareable link. You can send it to yourself however you like. I chose email and a Microsoft Teams Message.
Flow Three: Move Specific Files to Expiring Document Library / Converting to PDF
So far, I’ve implemented flows that handle documents that are manually copied over to the document library we have created. This requires the user to use the Copy To document selection in Sharepoint for each individual file. This does not allow for any pre-processing of each individual file before they are fed into the other flows. After testing the two flows with users and stakeholders, we learned that some file extensions should not be allowed to be shared with customers. Some of these file extensions could be shared if they were converted to a read-only type of document such as a PDF.
This calls for a creation of a third flow, which will be run on an individually selected file, where it will be checked for file type, converted to PDF if needed, then copied over to the expiring document library.

This flow contains three main actions, as well as some nested conditions that will test the document’s file extension.

The flow is triggered on a single selected file the user chooses. The Get file property is used to get metadata from the selected file.

The condition used checks to see if the file name contains a list of file extensions we are looking out for. These file extensions include files that we do not want sent to customers, as well as file extensions that need to be converted to PDF before being sent to customers.

If the file fails this condition, meaning the file does not contain a file extension from our list, the file is then copied over to the expiration document library where it will continue with the other two flows.

If the file does contain a file extension that was in our list, a second condition will be checked to discern between files that need to be converted to PDFs and files that we do not send to customers.

If the file passes the condition, meaning the file contains a file extension on our do not send list, an email or Microsoft Team’s message will be sent to the user notifying that the flow does not support the file.

If the file fails the condition, meaning the file must be converted to PDF before sending, the file is sent down a cascade of actions that will convert the file to a PDF.
The OneDrive Create file action creates a copy of the file to be converted to PDF using the Convert file action.
The Create file Sharepoint action is then used to create a Sharepoint file using the contents of the newly created PDF.
A Delete file action is used to delete the newly created OneDrive PDF file that was used as a template
Testing and Evaluation
I am grateful for my coworkers and company stakeholders for testing the early iterations of the workflow. Their feedback was important in the progression and addition of very important features that were not initially a part of the workflow. Having different viewpoints and testing the early versions of the workflow exposed issues that I was not aware of. Problems around processing duplicate files and file names with special characters were some of the issues that were discovered during user testing. This resulted in features added to clean up file names containing special characters, as well as appending file names with a unique identifier made of the user’s initials and date of expiration.
Another discovery was file extensions that were not to be sent to customers such as .vsdx or .doc files. This led to implementing a PDF converter to handle these extensions.
Conclusion
It was a fulfilling experience learning about Microsoft Flow, and implementing a working, automated solution that will be used in the company. I was able to build up a solution to a problem, test, gain feedback, and repeat the cycle until the product was polished and working. Thanks for making it this far in the post. I hope you found it helpful.
One Step Further
After using the workflow a bit, I discovered some friction points that I have implemented new features to alleviate. You can read about it in my post regarding Column Formatting in Sharepoint: blog post
Product Review | Fall 2020
Apple HomePod
$299
Apple
★★☆
The Apple HomePod has been mostly quiet since its launch three years ago. Without a major hardware or software update, the seemingly forgotten smart speaker takes a back seat in Apple’s current lineup of products. The cylindrical, 360 design of the soft, round speaker looks great and easily blends into the background of any room. The exterior is covered in a seamless fabric mesh, chosen for its acoustic properties, which feels soft and premium in the hands. A single glass touch sensitive panel sits on the top of the HomePod with Siri activated LEDs. Inside the HomePod are eight speakers, seven tweeters, a single woofer, and seven microphones. From my first listen, I was impressed with the amount of bass and sound that was coming out of such a small package. The HomePod can easily fill a large room with rich, full sound thanks to its 360 design, spatial awareness, and software processing. I am excited to try pairing two HomePods to create a stereo pair for what I’ve read to be an even better sounding system. The best way to interact with the HomePod is voice control with Siri. The HomePod has become the central hub for all smart devices in my home. I have enjoyed using Siri to play music, play TV shows and movies, set timers, switch my lights on/off, and play the news. The biggest downside is that to utilize the HomePod to its full potential, you must be ingrained in the Apple ecosystem. Many third-party apps such as Spotify have only recently gotten support with limited Siri capabilities. For example, if you wanted to play Christmas related music, ‘Hey Siri, play Christmas Music’, would only work if you had an Apple Music subscription. You can still play music from Spotify using AirPlay, but Spotify cannot recognize certain voice commands, rendering the ‘smart’ functionalities of this speaker useless. In short, these speakers sound amazing, but there are many factors that keep it from playing in everyone’s home. Competing products from Google and Amazon saturate the smart speaker market with diversified product lineups that are priced with a low barrier of entry that is accessible to any home. The HomePod’s hefty price tag prices them equal to many higher end speakers, creating greater expectations, while pricing out consumers just getting started in automating their home. The impressive sound and conveniences the Apple HomePod brings into my home has made it worth the higher price point, but it is hard to recommend this speaker to everyone, unless you are deep into the Apple ecosystem.


MX Master 3
$99
Logitech
★★★
When I think of ergonomic computer mice, unattractive and weirdly shaped hardware come to mind. I am sure the strange looking mice are great for long use and reducing fatigue, but they are not something I would enjoy using or seeing every day. The Logitech MX Master 3 changed my view of what an ergonomic mouse could offer in terms of design, comfort, and functionality. The wireless mouse has a sleek, non-offensive, natural feeling shape that is comfortable to use. Standard mice often feel a bit hollow and light, but the hardware in the MX Master 3 adds a nice resistance. The mouse has two silent scroll wheels, one for horizontal scrolling, and one for vertical scrolling. The vertical scroll wheel features an electromagnetic scrolling mechanism which can be activated with a single flick, allowing the wheel to scroll frictionless to traverse the page at over 1,000 lines a second. Four other buttons are placed around the mouse that can be programmed to any app specific function. The mouse is fast charged using USB-C and can last months with a single charge. The feature I was pleasantly surprised with is the ease of pairing. The MX Master 3 can be paired up to three devices at a time using a single button found on the underside of the MX Master 3. Bluetooth devices can be frustrating to pair. Having to manually pair the mouse every time you switch devices or keeping track of a small USB receiver is not ideal. With the MX Master 3, pairing is done once per device, allowing me to easily switch between my work PC to my personal MacBook with a single button with no additional pairing or syncing required.


Philips Hue Play
$129
Philips Hue
★★☆
The Philips Hue Play bar lights are one of many products that belong to the Philips Hue line of smart home lighting solutions. Capable of over 16 million colors and 50,000 shades of cool to warm tones, Philips Hue lights are an easy and fun way to change the mood in your living space. The Philips Hue Play is a long cylinder of light that can be laid horizontally at an angle, attached to the included stands vertically, or attached directly onto the back of a TV using adhesives. The ambient light bars can be placed anywhere in the room, but the marketing material have mostly shown the Hue Plays used as Bias Lighting behind TVs or monitors. Using the bars as Bias Lighting behind my TV was not my intention when purchasing, but I have since learned that Bias Lighting reduces eye strain and fatigue by reducing the contrast of the bright screen against the dark background. The lights do not come out of the box fully functional. A separate $59 Hue Bridge must be purchased that is used to link the lights to the network, and eventually to your phone where the main functionality lives. There is not a lot to say about these lights other than it being a fun novelty that isn’t priced as such. It’s unfortunate that the Hue Bridge does not come included with these already expensive pair of lights.


Apple TV 4k
$179
Apple
★★★
The Apple TV 4k is another product of Apple that has not seen a major upgrade in years, and after using it for some time, I’ve found that it isn’t needed. The list of requirements for what you would expect out of a media streaming device is not long:
Play a wide range of media files in high resolution
Offer apps to popular streaming services
A good user interface
The Apple TV 4k checks everything in that brief list. I used to question the need for a streaming device in the age of Smart TV’s, but after using a Samsung Smart TV for years, the user interface has never been updated and has become laggy to the point of being unusable. The user interface for the Apple TV 4k is the most minimal I have experienced in a good way. Other streaming devices are bombarded with moving previews and even worse, ads. Most popular streaming apps are natively supported on the Apple TV, allowing me to watch TV shows and Movies in high quality without buffering. This was not the case when I was using Plex on the PS4. The Apple TV 4k also has Siri integration, allowing for easy navigation through voice control. I’ve been enjoying using Siri to rewind or fast forward shows as well as search for videos. I no longer have to type out each individual letter of the search term. The remote is a razor thin slab of touch-sensitive glass, the main source of contention for users of the Apple TV. Users complain that the remote lacks grip or any tactile feedback, which are valid arguments that I have experienced myself. Holding the controller requires mindful handling to get right, something that shouldn’t be necessary for a TV remote. But once you figure out how to hold the thing, the touch sensitive glass makes it easy to navigate menus and scrub through timelines. Priced higher than streaming devices like the Amazon Firestick or Google Chromecast, the Apple TV 4k is on par with other streaming devices like the Nvidia Shield TV. Although the lower priced streaming devices can easily get the job done, I happily pay the premium of the Apple TV just to avoid ads.


Voigtlander Nokton Classic 35mm f1.4 SC
$599
Voigtlander
★★★
The Voigtlander Nokton Classic 35mm is the first M-mount lens I purchased for my Leica M-240 rangefinder camera. The lens is priced at $599, which is relatively affordable when compared to native Leica lenses which can run up to $3000. Being affordable does not equate to horrible quality. The 35mm focal length lens has an all metal and glass build that feels dense and very well built in the hands. It has a maximum aperture of f1.4 and is completely manual, which results in a smaller body due to the absence of internal motors. Aperture ring stops are tactile, and a crescent rest is built into the focusing ring, making focusing smooth and easy. When using lenses and cameras, I don’t like judging the quality based on focusing charts or pixel peeping that is often seen as a bench mark in other reviews. The Nokton Classic does not score well on focusing charts, with very soft edges stopped at f1.4. This lens is not clinically sharp, but produces soft classic renderings that I prefer. Manufactured to behave like vintage lenses, many have stated that the Nokton 35mm produces images similar to version 1 of Leica’s Summilux 35mm f1.4. Most important to me is the feel of the photos that photography gear produces, which is why the Voigtlander Nokton Classic 35mm has become one of my favorite lenses to use.


Product Review | Summer 2020
test excerpt
Fellow Stagg EKG Electric Kettle
$149
Fellow Industries
★★★
Fellow Industries Inc. is a San Francisco based company that designs and sells coffee making accessories. Best known for their award winning EKG Electric Kettle, Fellow offers a wide selection of well designed solutions that can be incorporated into your home brew ritual. I was looking for a kettle to use in preparing drip coffee. I decided to check out Fellow’s flagship electric kettle. The sleek, modern, electric kettle boasts a minimal design with a single large round button as the main controller. Opposite of the control is a similarly sized information display. Beautiful form is nothing without function. The EKG Electric Kettle features a list of useful functions for brewing the perfect cup of coffee. Temperature can be set to the degree for optimal extraction and can be held at the set temperature for up to thirty minutes. The gooseneck spout allows for slow, even pours, a necessity for making drip coffee. Holding down the single control for a few seconds starts a timer, useful for preventing over extraction. Although priced a bit higher than other kettles, the control the Fellow Stagg EKG Electric Kettle has given me over the brewing process has made using it every morning a joy, with the added bonus of looking great on the kitchen counter.


Chemex
$45
Chemex Corporation
★★★
The Chemex coffeemaker has been around for a long time. Invented in 1941, the timeless and elegant design has remained unchanged for over 70 years, with good reason. The coffeemaker is constructed from a single piece of borosilicate glass, tied around with a wooden handle and leather strap. It pairs with Chemex’s patented bonded filters to brew coffee using a drip method, producing a clean, balanced tasting cup of coffee. An issue I had with coffeemakers such as the french press or various espresso machines was the cleanup. Ground coffee beans would often end up being rinsed into the sink causing clogs. Cleanup is easy with the Chemex. The extracted coffee grounds stay within the bonded filter, which can easily be lifted and thrown away. The brewing process using the Chemex can be easy, or as involved as you want it to be. With a strong community of users, many brewing recipes can be found online. My current favorite recipe:
Materials
53g fresh, coarse ground coffee beans
700g, 200°F filtered water
Procedure:
Clean Chemex filter with heated filtered water to remove paper taste
Add 53g fresh, coarse ground coffee beans into Chemex filter
Saturate coffee beans with 100g of 200°F filtered water. Allow saturated beans to bloom for 30 seconds
After 30 seconds, slowly pour in 200g of 200°F filtered water in a circular pattern.
Repeat 2x times to reach a total of 700g


Kinto Travel Tumbler
$35
Kinto
★★★
Kinto is a Japanese brand that sells simple, comfortable to use tableware, drinkware, and interior accessories. The Travel Tumbler functions as any other stainless steel bottle. It keeps cold drinks cold, and warm drinks warm. What sets the Kinto tumbler apart from other bottles such as Hydroflask is it’s minimal, thoughtful design that has solved some of the problems I’ve had with Hydroflasks. The first thing you notice is the clean, minimal design. Kinto’s logo is placed out of sight near the bottom of the bottle, a sign of a brand who is confident in their design and product. The tumbler has a two cap system. Small slits in the first cap allow liquid to pass in a controlled manner, preventing burns from warm drinks, and keeping ice from falling out of cold drinks. An issue I had with bottles such as Hydroflasks was the exposed mouth piece. The caps in previous bottles I’ve used usually sat above the mouthpiece leaving the surface open to the environment. The Travel Tumbler’s second cap neatly covers the mouthpiece, solving the problem.


Taylor Digital Food Scale
$19.99
Taylor/Target
★☆☆
The Taylor Digital Food Scale is a glass top scale capable of measuring up to 11lbs. The scale has a slim profile, small footprint, and touchscreen interface. Through the glass interface, you can toggle through different measuring units (grams, kilograms, or pounds), tare to zero, and power the scale on and off. The problem with most touch screen interfaces is the lack of feedback and affordance. Physical buttons have an advantage over touchscreen interfaces. When you click a physical button, the button depresses, and you often hear an audible ‘click’, signifying that you have clicked the button. With a touchscreen like the one found on the Taylor Digital Food Scale, when you touch either the UNIT or TARE text, you’re left guessing whether the sensor picked anything up. I found myself tapping the TARE text multiple times to get the scale to register my touch. To power off the scale, you need to tap and hold down the TARE | power button, something that required trial and error to figure out. To fix the touchscreen feedback issue, I propose to add either a haptic feedback similarly found in iPhones, or a single beep sound. I would also separate the TARE and power button, though I suspect adding these features would drive prices up. I would not recommend this scale.


Airpods Pro
$249
Apple
★★☆
When the first Airpod was released, it was met with an overwhelmingly negative response. The sound was average at best, but what made it susceptible to criticism was the design. The long stem looked awkward. Although the design was a topic of contention, what won people over was the user experience. Apple excels at making their products work like magic, and that is what they did with the Airpod’s pairing mechanism using the W1 chip. Just open the magnetically latched case and the headphone is paired. Over time, the general public got over the initial shock and now the Apple Airpods is the best selling wireless headphone in the world. For the second iteration, Apple released a Pro version of the Airpods, with a shortened stem and now with noise cancelling. I’m not an audiophile, but I can appreciate a good sounding headphone. The Airpods Pro delivers excellent sounding audio, with great mid-tones and a balanced bass that isn’t overpowering. The sound quality is a slight improvement over the first generation Airpods, but that may be due to the Airpod Pro’s silicone tips that create a seal in your ear. The seal also makes it possible for active noise cancellation. The active noise cancellation is decent, able to drown out low droning background noises, but the high pitches of voices and movement are still audible. Although the active noise cancellation leaves me wanting more, the convenience of the size and pairing, combined with useful features such as transparency mode, has made the Apple Airpod Pros my daily wireless in-ear headphone.


Eorefo Rope Camera Strap
$18.99
Eorefo / Amazon
★★☆
I was looking for an inexpensive alternative to Leica x COOPH’s Rope Strap. Although the award winning camera strap made of climbing rope and leather details would have looked excellent on my Leica M 240, I was not comfortable paying $95 for a piece of rope. After searching the internet for alternatives, I found Eorefo, an unknown brand that sells various types of camera straps at an affordable price point. I decided to try their rope strap in olive green. The strap is made of nylon climbing rope. Not as rugged or tough as the Leica x COOPH Rope Strap, and stretches a bit when pulled on. Leather details are replaced with a leatherette material, but functionally they are the same. Both protect the camera body from the attaching O-ring which I appreciate. Because of the rope is thin, this rope camera strap works best with lightweight mirrorless or full-frame cameras. I wouldn’t imagine it would be comfortable paired with a heavy DSLR. The quality does not feel premium, but given the inexpensive price point I am pleasantly surprised.


