Reviews


-
Biolytic
- Mar 13, 2026 Creating an Automated Notification and Approval System for Cross-functional, Collaborative Efficiency Using Microsoft Power Automate Mar 13, 2026
- Apr 8, 2021 Conditionally Display Microsoft Flow Activating Buttons in Sharepoint Libraries Using Column Formatting Apr 8, 2021
- Apr 7, 2021 Create a Self-Sustaining, Expiring Document Sharing System Using Sharepoint and Microsoft Flow Apr 7, 2021
-
Grad School
- Aug 17, 2022 CS-7646 | Machine Learning for Trading (ML4T) | Summer 2022 Aug 17, 2022
- May 9, 2022 CS-7638 | Robotics: AI Techniques (RAIT) | Spring 2022 May 9, 2022
- May 3, 2022 Georgia Institute of Technology May 3, 2022
-
Misc
- Dec 16, 2025 J R L - Stow Lake 2025 Dec 16, 2025
- Nov 2, 2025 LHCE - Home Studio 2025 Nov 2, 2025
- Jan 29, 2025 L+H+C at Palace of Fine Arts Jan 29, 2025
- Nov 27, 2023 FAN EXPO San Francisco 2023 Nov 27, 2023
-
Reviews
- Apr 15, 2021 Product Review | Winter 2020 Apr 15, 2021
- Dec 1, 2020 Product Review | Fall 2020 Dec 1, 2020
- Sep 18, 2020 Product Review | Summer 2020 Sep 18, 2020
-
Tech Tutorials and Project Write Ups
- Mar 13, 2026 Creating an Automated Notification and Approval System for Cross-functional, Collaborative Efficiency Using Microsoft Power Automate Mar 13, 2026
- Mar 28, 2025 Setting up a Final Cut Pro Project 2025 Mar 28, 2025
- Apr 8, 2021 Conditionally Display Microsoft Flow Activating Buttons in Sharepoint Libraries Using Column Formatting Apr 8, 2021
- Apr 7, 2021 Create a Self-Sustaining, Expiring Document Sharing System Using Sharepoint and Microsoft Flow Apr 7, 2021
-
Travel
- Jan 6, 2026 Vietnam 2025 Jan 6, 2026
- Jul 30, 2025 London 2025 Jul 30, 2025
- Jul 29, 2025 Paris 2025 Jul 29, 2025
- Jul 29, 2025 Milan 2025 Jul 29, 2025
- Jul 29, 2025 Rome 2025 Jul 29, 2025
- Jan 12, 2025 Big Island 2025 Day 2 Jan 12, 2025
- Jan 12, 2025 Big Island 2025 Day 1 Jan 12, 2025
- Jan 12, 2025 Oahu December 2024 Jan 12, 2025
- Jul 27, 2024 Mt. Rainier 2024 Jul 27, 2024
- Jul 27, 2024 Seattle 2024 Jul 27, 2024
- Jun 25, 2024 Oahu June 2024 Jun 25, 2024
- Jan 6, 2024 Oahu 2023 | Day 5, 6, 7, 8 Jan 6, 2024
- Jan 6, 2024 Oahu 2023 | Day 4 Jan 6, 2024
- Jan 6, 2024 Oahu 2023 | Day 3 Jan 6, 2024
- Jan 6, 2024 Oahu 2023 | Day 1 & 2 Jan 6, 2024
- Aug 8, 2023 Olympic National Park 2023 | Day 3 Aug 8, 2023
- Aug 8, 2023 Olympic National Park 2023 | Day 1 & 2 Aug 8, 2023
- Jan 7, 2023 Las Vegas 2023 Jan 7, 2023
- Nov 24, 2022 Disneyland 2022 - Day 2 Nov 24, 2022
- Nov 24, 2022 Disneyland 2022 - Day 1 Nov 24, 2022
- Aug 22, 2022 Sequoia and Kings Canyon National Park Aug 22, 2022
- Jul 14, 2022 Seattle 2022 Jul 14, 2022
- Jun 1, 2022 Mount Rainier National Park Jun 1, 2022
- Apr 26, 2022 Coachella 2022 Apr 26, 2022
- Nov 20, 2021 Joshua Tree National Park Nov 20, 2021
CS-7638 | Robotics: AI Techniques (RAIT) | Spring 2022

Choosing my first graduate school course at Georgia Tech required time and considerable research. With so many subject matters and difficulty levels to choose from, I had to conduct extensive research to pick the right one, as this first impression would set the tone for the rest of my graduate education. Another factor that I had to take into account was Georgia Tech’s policy that requires two B’s or higher in two courses the first year to maintain enrollment. After many hours cycling through reddit, google, and OMSCentral (a student run course ranking board website), I decided on taking CS-7638 - Robotics: AI Techniques (RAIT), an average difficulty course with great reviews.
Syllabus
The course teaches different artificial intelligence algorithms that are commonly used in robotic systems such as self driving cars, or robotic vacuums. The lessons are structured to teach us how to program all the major systems of a robotic car based on lectures from the former leader of Google and Stanford’s autonomous driving team, Dr. Sebastian Thrun. The course itself is instructed by Georgia Tech’s Dr. Jay Summet and various TA’s.
Learning Objectives
The objectives for this course were:
Implement filters (Kalman and Particle filters) in order to localize moving objects whose locations are subject to noise.
Implement search algorithms (including A*, Dynamic programming) to plan the shortest path from one point to another subject to costs on different types of movement.
Implement PID controls to smoothly correct an autonomous robot’s course.
Implement a SLAM algorithm for a robot moving in at least two dimensions.
These objectives were met through Problem Sets, Projects, and Exams. Programming in this course was done in Python 3. Math used in this course was primarily probability and linear algebra.
Projects
The largest bulk of information learned and what accounted for 60% of our course grade were projects. Projects contained some starter code and a doc sheet with requirements that our program had to follow. The goal for each project was to implement filters and algorithms we had learned from lectures using Python. Although time consuming, completing these projects solidified robotics AI techniques and was thoroughly fulfilling.
Project 1: Kalman Filter
In the first project, we were tasked to implement a Kalman Filter to estimate locations of incoming meteorites, and to navigate a turret towards the moving meteorites to destroy them. The course provided the working environment, with test cases that included a random set of incoming meteorites.
Kalman Filter is an algorithm used to estimate system parameters, even ones that are not observed. In our project, we used Kalman Filter to take in a noisy measurement input to estimate the future state and velocity of a meteorite.

Image from: https://thecustomizewindows.com/2019/03/kalman-filter-to-stabilize-sensor-readings/
Above are the general steps used in a Kalman Filter. In summary, the Kalman Filter works in two phases, the Prediction Phase and the Measurement Phase. In the prediction phase, the Kalman Filter produces estimates of the current state variable using the initial or previous state. In the Measurement, or update phase, new sensor measurement inputs are used along with our new predicted state in a calculation to predict the updated state. The average is weighted using a calculated Kalman Gain to determine which value (measurement, or predicted) we trust in more. The new updated predicted state is then fed back into the filter as the previous state until we get closer and closer to the actual state.
Having estimated the meteorite’s state of location and velocity using a Kalman filter, I was then able to use knowledge of our grid world, the predicted state, and trigonometry to guide our turret towards the meteorite to destroy it.
Project 2: Particle Filters

In this project we implementing a particle filter to estimate locations of planets in a solar system. We populated the grid world with N number of particles, assigned each a weight based on the particle’s gravitational reading from our sensor compared with the planet’s gravitational reading, and resampled our population with particles of higher weight being chosen more frequently. Particles with similar sensor readings to our planets are assigned a higher weight. This algorithm is survival of the fittest, where measurements that are far from actual are more likely to be removed from the population through resampling.
Project 3: PID Control
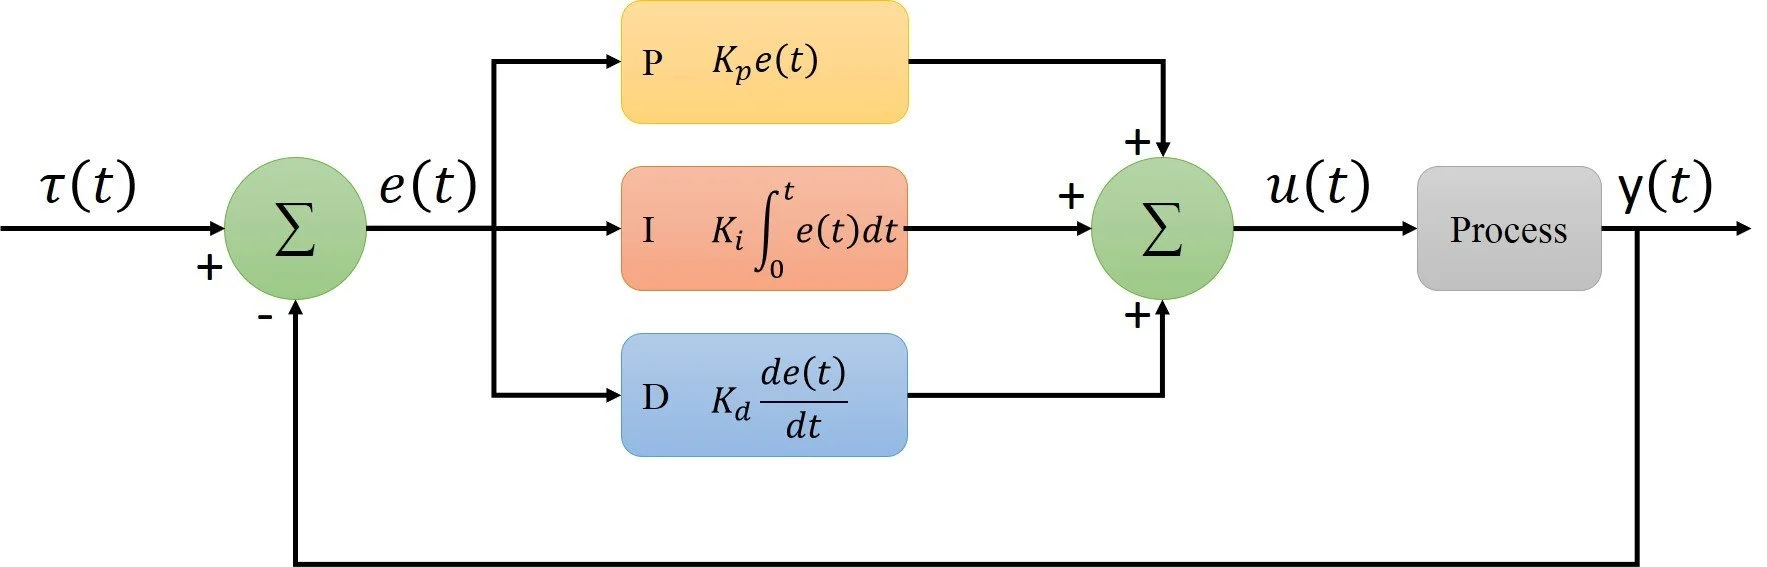
For this project, we implemented a PID controller to control a flying drone’s hovering altitude and location. Given a goal altitude and location, we needed to control the drone’s RPM to hover at the target location and altitude for a specific time limit. We implemented P, proportional control to reduce our error (in this case difference in position from goal) by controlling the drone’s propeller RPM in proportion to distance away from goal. This parameter needed to be tuned until we were getting our drone close to our goal.

This resulted in our drone oscillating around the target altitude, where the drone would approach the target altitude, but overshoot it, then correct itself. To account for this, we needed to incorporate the derivative of the error in our calculation. The derivative produces an output based on the rate of change of the error. This means as the drone approaches the goal altitude, the value of the derivative approaches 0, smoothing down the approach towards goal, which prevents oscillation and overshooting. To account for system errors, an integral of the error is added to the calculation. The integral control will continuously increment or decrement the controller’s output to reduce the error to 0.
The PID controller was simple to implement. The greatest challenge was fine tuning each parameter to minimize error. This could be done manually, or using a Twiddle Algorithm.
Project 4: Warehouse Search
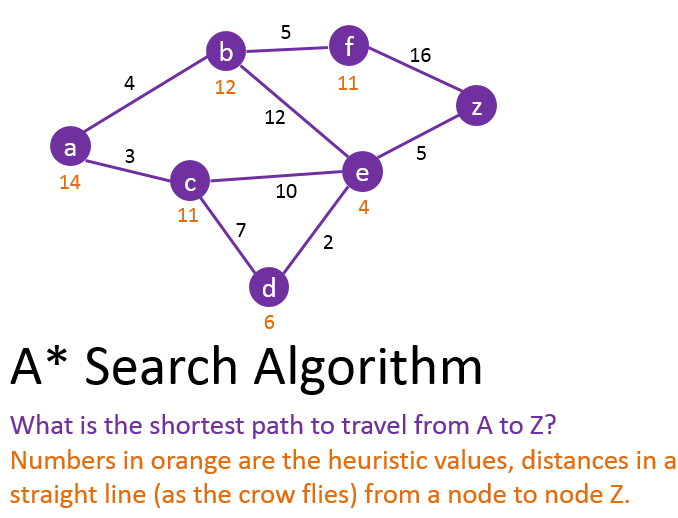
The fourth project involved controlling a robot around a warehouse to retrieve and drop off packages. We were to implement search algorithms, mainly A* Star and Dynamic Programming for stochastic cases where the starting position is unknown. The warehouse world is a discrete grid, with each position having varying costs. We had to find the most efficient path to the package, and to the drop zone.
A* search algorithms uses a known starting position and expands outwards and checks whether neighboring spaces are the goal, all while keeping track of accumulating costs. A* Search algorithms also use a heuristic function as a map to guide its decision.
Dynamic programing accounts for the stochastic nature of the world by calculating optimum paths to the goal from any starting position. Implementation of Dynamic programming to find the optimum path from any position to a goal has the same structure as A*star, with some extra accounting steps for a value grid that is used to count backwards from the goal to calculate the cost of reaching the goal from any position. These costs are then used to assign the action that the robot needs to take.
Project 5: SLAM (Synchronous Localization and Mapping)
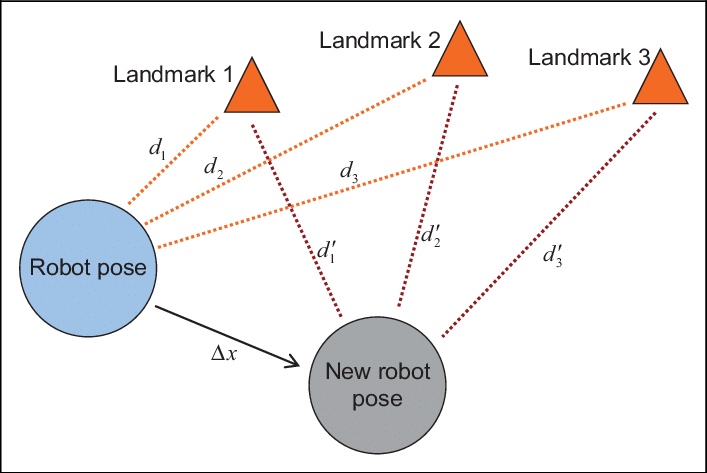
In project 5, we had to localize our drone while navigating the drone to a known treasure position. With an unknown map, we could not localize using traditional filters or methods. We implemented an online SLAM (synchronous localization and mapping) algorithm to localize our robot while mapping out positions of landmarks in our map. We use sensors of landmark positions and movements to update our state matrix with the location of our drone and of the landmarks. We do this by considering the measurement and movement constraints and doing simple matrix multiplication.
Conclusion
CS-7638, Robotics: AI Techniques (RAIT) was a great first impression into the program. I highly enjoyed the course topics, the way it was presented, and the support received from my colleagues and TA’s. At times, the projects seemed impossibly challenging, but the process of overcoming unknowns through days of research and debugging reinforced my learning of the implementation of the algorithms and was fulfilling. Aside from learning algorithms and python, It was a good learning experience for managing and allocating my time between grad school, a full-time job, and family and friends.
Georgia Institute of Technology


Why grad school?
Navigating my early career after undergrad has been a relentless and confusing journey. The beginning of my professional career was met with uncertainty and anxious thoughts of whether my degree in Bioengineering was the right choice. I spent the time exploring various professions that I thought my degree prepared me for, only to realize I didn’t enjoy working in research (molecular biology) laboratories very much. I had to reevaluate my career trajectory and examine why it wasn’t aligned with the opportunities I had hoped my Bioengineering degree would provide. After learning and gaining working experience in web development, I have come to the conclusion that I enjoy using my creativity to program solutions with code. Though I took courses in computer science as part of my undergraduate program, I still have a lot to learn. I decided to pursue a master’s degree in computer science to satisfy my curiosity to learn more about this field and to pick up useful tools along the way. I matriculated at Georgia Tech in Spring 2022.
Why Georgia Tech?
Online Distributed Learning
Aside from being a renown university for Computer Science, I heavily considered Georgia Institute of Technology for being a leader in online distributed learning. One of the criteria I had when considering graduate schools was the possibility of online learning. I wanted an accredited program where I could pursue a degree without halting my industry growth. I also have bills to pay 🙃. In the past, online distributed learning has been met with jokes of being ‘less than’ when compared to on campus learning. This view is a misconception, but may have been propagated by the proliferation of for-profit, unaccredited institutions. With the pandemic and the widespread roll out of ‘Zoom’ school, I hope people could see the utility and legitimacy of online distributed learning. Since 2014, the online master's of computer science program at Georgia Tech has grown a positive reputation with excellent reviews. I appreciate that the online course selection is expansive, and is a direct equivalent of on-campus courses, taught by the same campus faculty.
Cost
Another big factor in my decision was cost. I had also considered Johns Hopkins University’s program, as well as University of Pennsylvania’s program, but in addition to poor reviews, the price for tuition was shocking. After being scarred from paying off my undergraduate tuition, I was in no hurry to put myself back in debt with student loans. Johns Hopkins and UPenn’s programs can run you $40,000 - $60,000, roughly $4,000 - $5,000 per course. This value is ridiculous compared to Georgia Tech’s tuition of $7,000 - $8,000 for the entire program!
Community
Finally, the last factor I heavily considered when choosing a graduate program was community and resources. Georgia Tech has a large and growing network of alumni who have completed the online master’s program, as well as an active reddit community and slack channel. Since this program is online, having a sense of community and camaraderie among my peers was important. After finishing my first semester, I am happy to have chosen Georgia Tech. The support from TA’s and my peers on Slack / reddit have been a large component of my success and motivation to continue.
Application Process
The application was a straight forward process. I gathered all required documents, letters, and statements to submit with my application by the deadline. No GRE was required. The decision was returned a few weeks after the deadline.
Requirements
Undergraduate degree in computer science or related field
Cumulative GPA of 3.0 or higher
Transcripts
Three letters of recommendation
Statement of Purpose
Supplemental Objectives Statement
Closing Thoughts
The program requires completion of 10 courses of your choosing with specializations offered for Computational Perception & Robotics, Computing Systems, Interactive Intelligence, and Machine Learning. I have completed my first semester taking CS 7638 - Robotics: AI Techniques and have had a wonderful time. I have thoroughly enjoyed my first semester and am excited to continue through the Computing Systems specialization. Individual course reviews and summary posts will come.
Go Yellow Jackets! 😁

Coachella 2022
After a 2 year hiatus, Coachella (and live music) are back! This year marks my fourth year returning to the desert.
All photos were taken with the iPhone 13 Pro Max


Food
Music and artists are not the only things featured at Coachella. The festival also curates large scale art from various artists, and offers delicious food from trendy eateries from all around America.
We were able to excitedly try
Prince Street Pizza - Sicilian style pizza
Bolo - Fried chicken sandwich with a Bolo (pineapple) bun)
Hattie B's - Nashville style hot chicken sandwich
Kogi - Korean BBQ truck


Music / Stages
Sahara Stage

Yuma

Madeon at the Outdoor Theater

Louis The Child at the Outdoor Theater

Sonora Tent

Do Lab

Large Scale Art by Various Artist
Circular Dimensions x Microscapes by Cristopher Cichocki


The Playground by Architension


La Guardiana by Ramon and Christian Cardenas / Buoyed by Kiki van Eijk’s


Mutts by Oana Stanescu


Cocoon by Martin Huberman / Spectre by NEWSUBSTANCE


Joshua Tree National Park


Joshua Tree National Park
Date Visited: Friday, November 12, 2021 - Saturday, November 13, 2021
I feel extremely lucky and privileged to live in California, home of nine national parks! Joshua Tree National Park is the third national park I have visited. The park is located in southern California, just two hours east of Los Angeles near Coachella valley. Named for the region’s twisted, bristled Joshua trees, the park is littered with thousands of the namesake trees as far as your eyes can see, interrupted only by the numerous gigantic, other worldly rock formations. Visiting in Fall / Winter was perfect and recommended, as the temperature never rose above unbearable.
Joshua Tree Visitor Center


Before entering the park, we stopped by the visitor center for souvenirs and park information. Knowledgeable park rangers were waiting outside the entrance to help guests with trail suggestions and general questions.


Cap Rock
Cap rock is an easy 0.4-mile loop trail with a view of a large rock formation with a smaller, flat rock balancing on top of it. https://www.alltrails.com/trail/us/california/cap-rock-trail


Hidden Valley Trail
Hidden Valley trail is an easy 1.0 mile loop with great views of Joshua Trees and huge rock walls of which you may see rock climbers traversing. Hidden valley is a great name for this trail, as it feels like you’ve been transported into a magically quiet landscape in the middle of nowhere. Surrounding the valley are fun blocks of rocks that just inviting you to climb them.
https://www.alltrails.com/trail/us/california/hidden-valley-nature-trail?ref=result-card


Cholla Cactus Garden
Cholla cactus may seem like friendly, furry teddy bears, but be very cautious around them. Along the perimeter of the cactus garden are signs warning tourists of the ‘jumping’ nature of the cactus needles. The best time to visit the Cholla Cactus gardens is during sunrise, when the sun rises perfectly behind the cacti, making the ‘fur’ glow a brilliant golden hue.


Night Photography
Joshua Tree National Park is an astrophotographer’s dream. With light pollution at a low, the milky way can be visible with the naked eye. We did not account for the moon’s cycle, so you may have to wait until the early AM for complete darkness when the moon is over the hemisphere.


Arch Rock Nature Trail
Another jumbo rock playground. A must visit.
https://www.alltrails.com/trail/us/california/arch-rock-trail--2?ref=result-card


Keys Point
Key’s point may be the most crowded location and visited location in the park. Key’s point is the go to sunset spot, with a high elevation and views of the Coachella Valley. Something about watching the sunset on Key’s point with a large group of travelers from all around the world did feel like a spiritual experience.


Product Review | Winter 2020
Keychron K2
$69.00 - 79.00
Keychron
★★★
Keychron designs, manufactures, and sells mechanical keyboards. Since forming in 2017, the company has had great traction, with highly positive reviews from top tech reviewers and publications, with good reason. Keychron makes great, affordable mechanical keyboards with all the features you would want in a modern computer peripheral. Unlike membrane keyboards typically found in modern devices, each individual key cap found on mechanical keyboards lay on physical plastic switches which return a nice tactile feel and sound on click. Mechanical keyboards are fairly customizable to your personal preferences, which may be why they are so popular within niche communities. The main customizable component are the key switches. Cherry MX Switches are popular switches used in mechanical keyboards and are referenced by their key-stem color, each with its own distinguishable auditory and tactile feedback. Examples include:
Cherry MX Reds: Linear switches, 45 grams of force to actuate, quiet
Cherry MX Blacks: Linear switches, 60 grams of force to actuate, quiet
Cherry MX Blues: Tactile switches, 50 grams of force to actuate, clicky and loud
The Cherry MX Brown switches on my Keychron K2 have been the perfect balance between the Red and Blue switches, tactile but not too loud. The keyboard can be used wirelessly with Bluetooth, or wired. The outer casing of the Keychron K2 is minimal, with one USB-C port for charging and wired use, a switch for choosing between wireless, wired, or off, and a switch for choosing between a Mac keyboard layout or a PC keyboard layout. When used wirelessly using Bluetooth, the backlit keyboard can be programmed to three different devices, and can easily be switched between devices by clicking the fn + 1, 2 or 3 key. I’ve enjoyed being able to effortlessly switch between using PC and Mac devices using a single wireless keyboard. Battery life is great, lasting more than a month before having to charge. The tactile feel of the Keychron K2 makes mundane tasks such as typing somewhat enjoyable. It’s not going to dramatically change your life or productivity levels, but in terms of keyboards, it is an attractive, wireless, mechanical, option for any setup.


Dell 4k Ultrasharp (U2720QM / U2720Q)
$550 - $719
Dell
★★★
Working from home during the pandemic has forced a lot of us to rethink our home office situation. As a person who primarily and happily uses their 13-inch laptop screen for personal use, I was reluctant to buy an external monitor. But the workload efficiency was taking a hit which led to researching and purchasing the Dell 4k Ultrasharp U2720QM monitor. There were a few specific specifications I needed in my monitor and the Dell U2720QM hits all of the requirements. The 27-inch 4K resolution monitor renders color-accurate pixels at a high enough density to preserve sharp text while up-scaling. The thin IPS monitor has a flat almost bezel-less display with a refresh rate of up to 60Hz, which is smooth enough for me but may not be for gamers. The sharp, boxy design of the monitor gives an industrial, and professional workhorse feel, and the flat base adds extra support without taking away valuable desk space. The most important feature to me was having a USB-C display port, allowing me to transfer display information and charge my laptop at the same time using a single USB-C cable. This results in a fully charged laptop whenever I disconnect it from the monitor. The Dell 4K Ultrasharp has extra ports conveniently placed on the side of the monitor to easily charge accessories or connect other devices without having to connect it to your computer. The adjustment angles on Dell monitors are superb, allowing you to tilt, swivel, and pivot any amount you need, useful for coding vertically on a secondary monitor, or just adjusting for ergonomics. For coding, graphic work, photography, and regular internet browsing, the Dell 4K Ultrasharp U2720QM has been pleasant to use, checking off all of my requirements with no complaints.


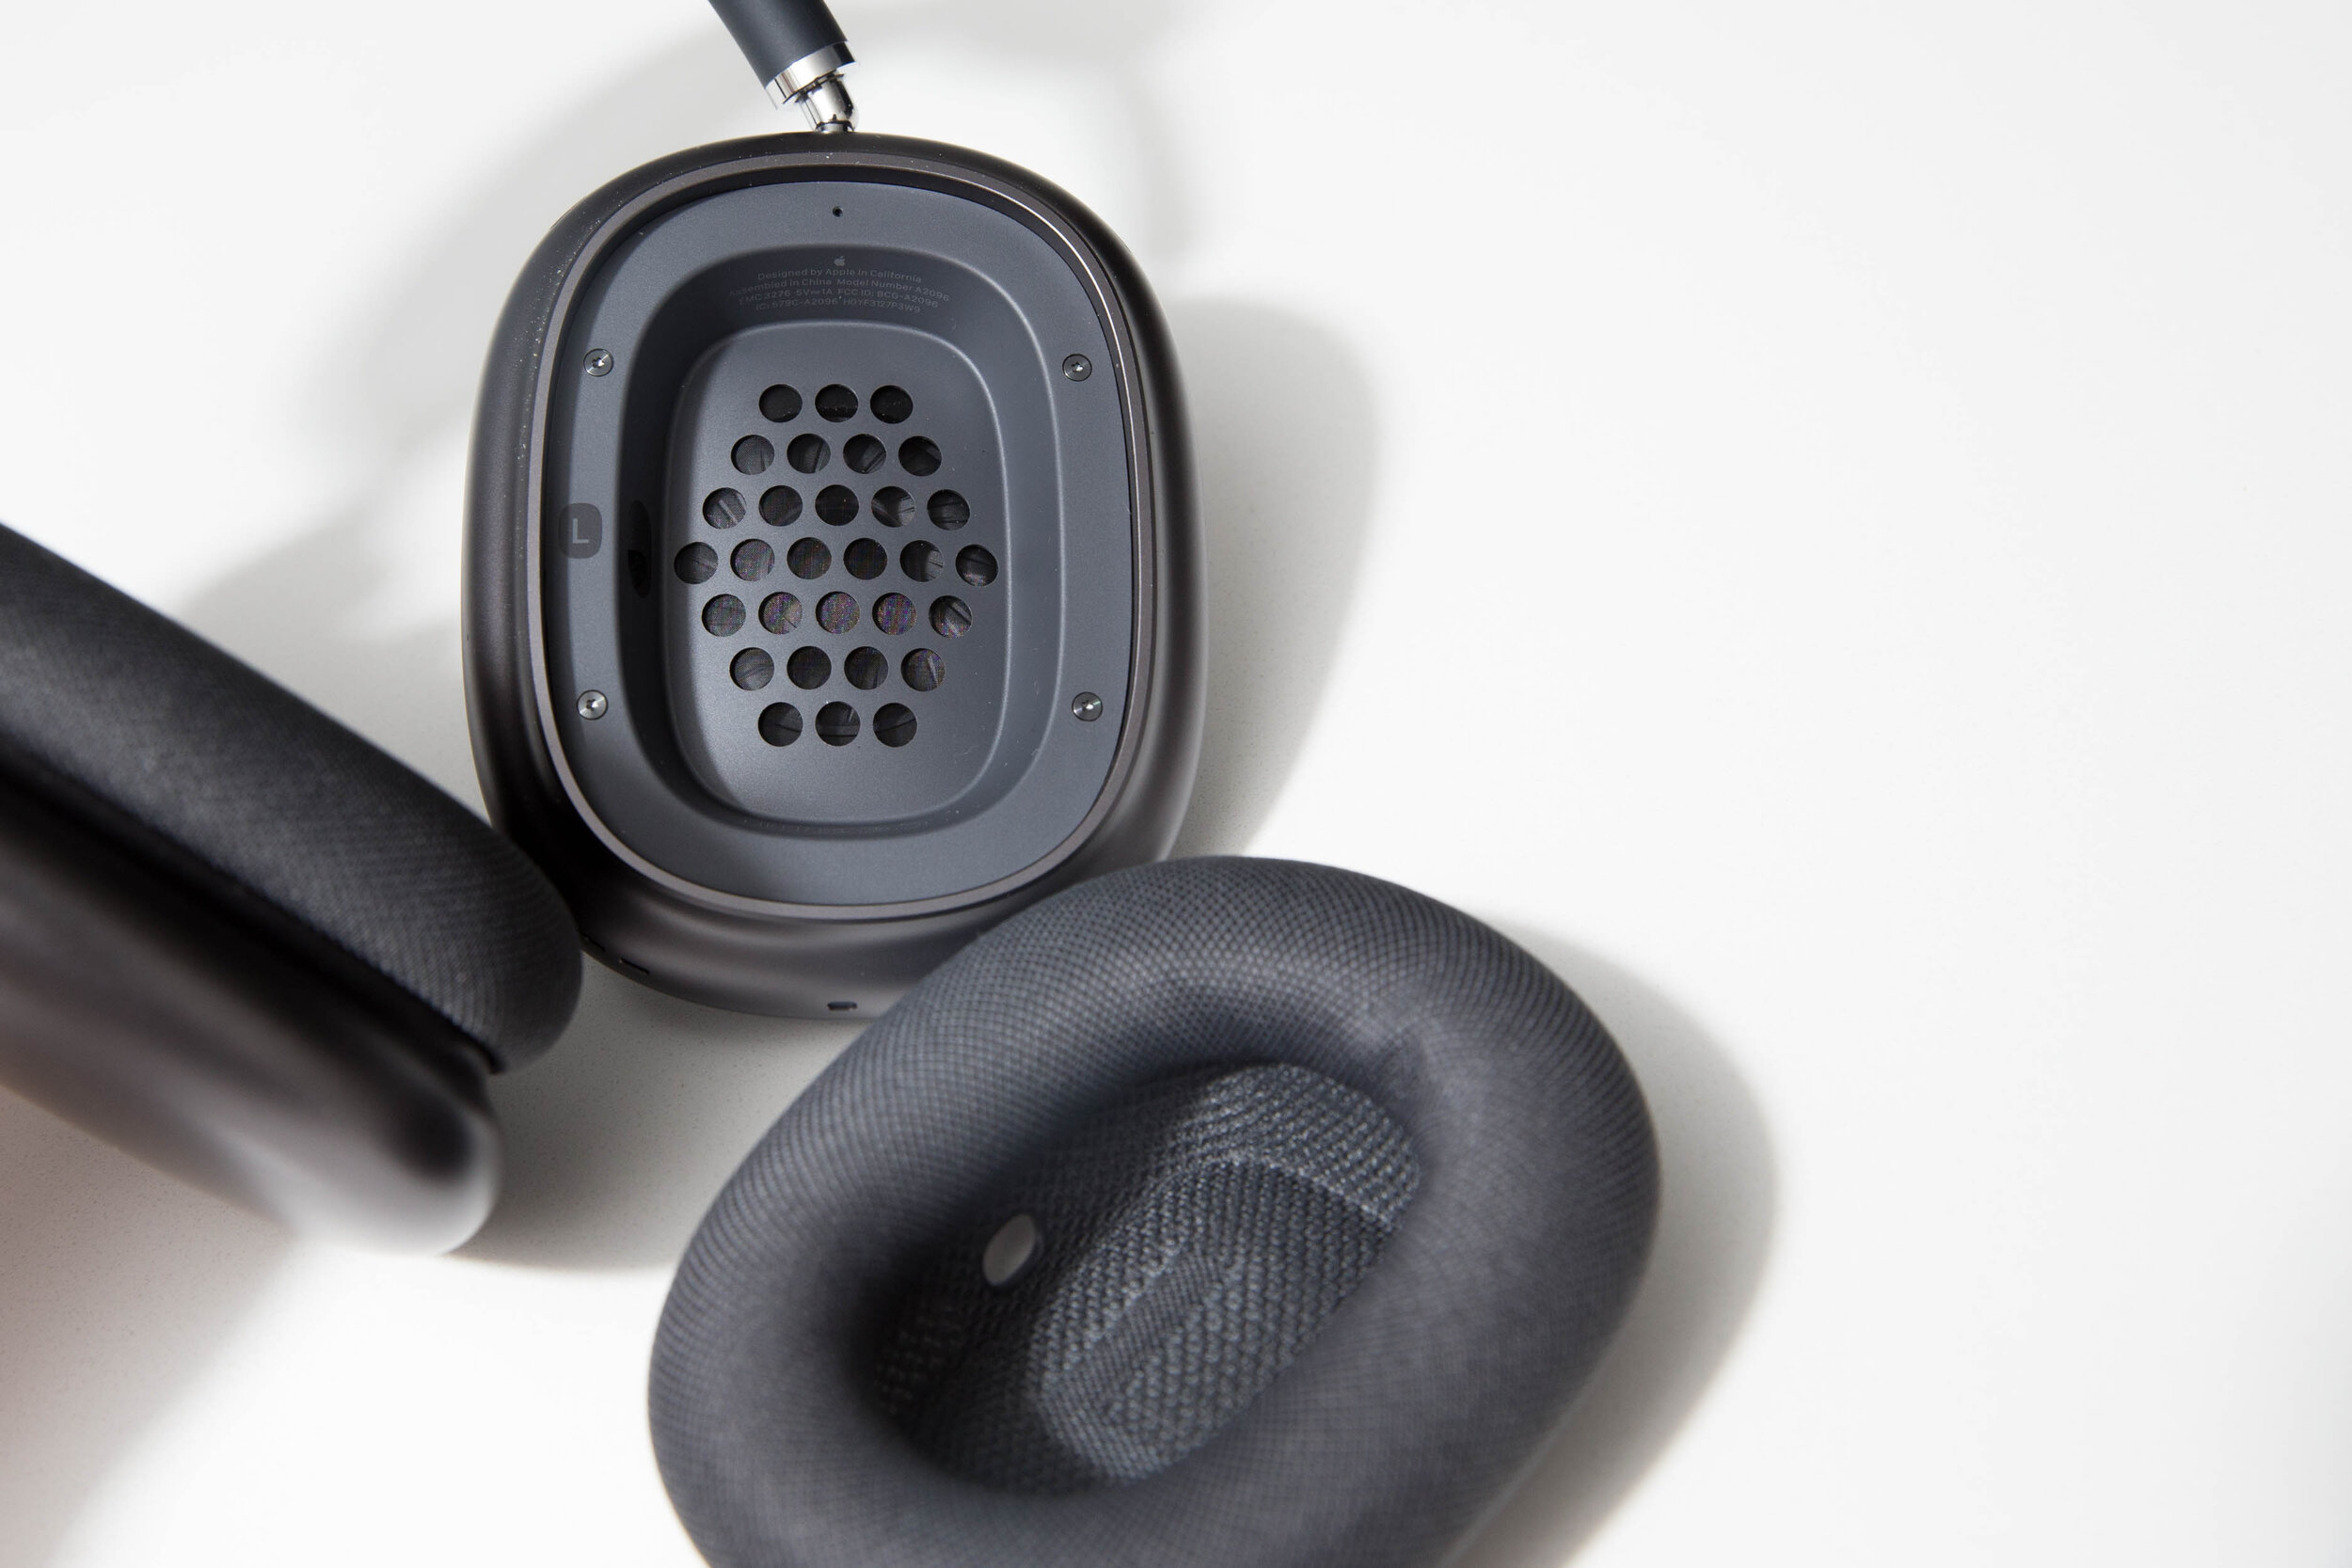
AirPods Max
$549
Apple
★★★
After many months of rumors and speculations, Apple finally released their take on an over-ear headphone. And as with most of Apple’s recent product releases, it came with a lot of controversy, notably around the design and price. When compared with other over-ear headphones in the same market, which range from $250-$350, Apple’s AirPods Max is priced significantly higher. Aside from the price, many critiqued Apple’s design choices, mainly for the AirPods Max’s Smart Case. After reading through the critiques and memes that came with the initial launch, I was intrigued to try it for myself. I am impressed. From the large, minimal aluminum ear cups to the mesh net canopy, the materials used in these headphones are top notch. They are noticeably heavier than their plastic counterparts like the Bose QCII or the Sony XM4’s, but they feel more substantial in the hands. These headphones are comfortable. The large mesh ear cups cover the entire ear, relieving any pressure that over ear headphones usually have. Although it covers your ear, it does not get hot after prolonged use. They have an added bonus of being magnetically attached and detachable, which allows you to replace them when they inevitably wear down, something not found in most headphones. The canopy feels lightweight and does a great job to evenly distributes the weight of the AirPods Max so it feels as if nothing is there if you’re stationary. Telescope arms allow for step-less adjustment allowing for a universal fit. Controls are minimal, with only one physical button for turning on transparency/noise cancelling mode, and a familiar digital crown that controls volume, play and pause. I’m glad Apple went with physical buttons and not touch gestures that other companies are doing. It is a much better experience and satisfying feeling to operate using physical buttons, especially since all operations are done outside of your field of vision. The sound is crisp, clear, and bass is perfectly balanced and not muddy. Software integration with Apple products is amazing and intuitive as always, and brings the listening experience to another level. I’ve owned the Bose Quiet Comfort II’s in the past and returned them. Having to manually turn on, pair, and opening a separate app to adjust noise cancellation or other settings was not ideal. Apple stripped all these friction points, including the on/off button, resulting in a fast and straightforward operation. Noise cancellation and Transparency mode are the best in the market and feel comfortable to use for long stretches of time. Battery life has not been a problem. Quality materials make these headphones heavy, and it is apparent when you turn your head side to side, which deters me from using these headphones while running or to work out. The smart case did not bother me as much as it bothered other people. I primarily use the headphones at my desk so the smart case adequately protects the aluminum cups, although I agree that it does feel like a first generation product that will hopefully be improved on in future iterations. The AirPods Max are unconventional in an industry leading way, and can really only be categorized in a market sector of its own, sitting in between upper-end consumer headphones and high-end professional grade headphones. Apple AirPods Max is an all around great package, with its high quality materials, crispy HiFi sound, and magical software integration.


Always Pan
$145
Our Place
★★★
Non-stick pans are not a new invention, but none have been marketed like the Always Pan from Our Place. The beautifully designed and highly functional non-stick pan comes in an array of modern colors making it an attractive option compared to the sea of boring pans. The pan comes with niceties such as an integrated wooden spatula holder on the handle, and rubberized touch points on the lid and pan. Two grooves on the upper lip allow steam to escape. On other pans, lids usually have a steam hole somewhere on the surface, which get dirty and hard to clean over time as minerals build up. The grooves on the Always Pan addresses this problem, making clean up easy. Being a non-stick pan, clean up is magic, often needing no effort to wash away residue. I’ve had burned black crusts that have enveloped on the interior of the pan, but after a quick rinse and scrub with their included natural sponge, the pan looks new again. The pan comes with a bamboo spatula, as well as a steamer basket that fits perfectly in the interior. One critique I have of the Always Pan is its handles. The main rubberized handle is fine, but I have ran into problems with the handle opposite of the rubberized handle. This side of the pan is not rubberized, but is designed with affordances of a regular handle. This may be useful when the pan is at room temperature, but when the pan is on the stove, I along with others have burned their hands trying to grab the handle to move the pan. I suppose the most optimal way to use this would be to utilize a cooking towel, but I wish I did not have to learn this the hard way. Rubberizing both sides of the pan would solve this issue. Regardless of this issue, the Always Pan has been my most used kitchen cookware. Versatile, beautifully designed, and most importantly magically easy to clean, the Always Pan from Our Place has been a joy to use.


Assorted Reads
★★★
A short list of recent stand-out reads. Single sentence summaries.
The 7 Habits of Highly Effective People by Stephen R. Covey
Thought patterns to instill personal growth, accountability, and synergistic relationships.
Why We Sleep by Matthew Walker, PhD
A strong argument backed by numerous studies for getting a solid 8 hours of sleep every night.
Deep Work by Cal Newport
To have a fragmented attention span is an unsatisfying and unproductive way to live life.


Conditionally Display Microsoft Flow Activating Buttons in Sharepoint Libraries Using Column Formatting
Before Column Formatting:

Image from support.microsoft.comAfter Column Formatting:

Image from support.microsoft.comIntroduction
This post goes over how I used Sharepoint’s Column Formatting to solve some points of friction I experienced when executing a specific automated workflow. If you have not read my post on creating an automated file sharing workflow, you can read it here: blog post. This post is a continuation of sorts, but can also be a stand-alone read where you can learn how to use column formatting to solve some of your specific problems.
Column Formatting allows you to customize the look and feel of your Sharepoint library or list. Column Formatting lets you do whatever you want, as long as you follow it’s schema. People have used Column Formatting to make document lists visually meaningful and incorporating useful features such as buttons that simplify activating automated workflows. I will go over how I incorporated a flow activating button to solve some pain points I had in my automated flow.
Problem

Activating flows for selected files is a three click process. You click the three dots to bring out a menu where you can navigate through the Automate dropdown to find the flow you want to run.
This is straightforward for experienced users and for document libraries with a few flows. It may get complicated down the line when there are a large number of flows, which may confuse the user into clicking the wrong flow. Another problem is activating flows on files that are not supported. In my example, my company does not send specific file extension to customers. Having the option to run the flow on unsupported files wastes time and effort.
Solution

The implemented solution can be seen on the right. I created a new column called ‘Create Shareable Link’ where buttons are conditionally displayed on specific file extensions to activate a flow on click.
Notice how the button does not render on folders or certain extensions like .vsdx. This prevents the user from even starting a flow on unsupported files. The button column serves as a fast visible cue on what is supported versus what is not supported, greatly increasing the user’s experience from a multiple click step that may result in a failed flow, to a quick one click solution.

You can start formatting Sharepoint columns by clicking on your column header, going into Column settings, then clicking Format this column. If a column does not exist, you can create one in your list or library settings.

Formatting columns follows a JSON schema. You can find the general format on the official Microsoft Sharepoints page, but you can copy the code below and edit it as a starter. This JSON renders a button that activates a specific flow. The flow is set in the customRowAction field. You will have to replace the id with the id of your own flow. You can see how you can get your flow ID below.
Styles for your button and how it is rendered can be written in the style field. I have added a display and visibility property to filter which files the button will be displayed with. The JSON uses excel like code for conditional statements.
I used a nested if-statement to check file names ($FileLeafRef) for extensions we do not support. If it passes, the button will not be rendered.
The visibility field checks for folders and hides the button if it passes.
You can copy the Schema below:
{
  "$schema": "https://developer.microsoft.com/json-schemas/sp/v2/column-formatting.schema.json",
  "elmType": "button",
  "txtContent": "Create Link",
  "customRowAction": {
    "action": "executeFlow",
    "actionParams": "{\"id\": \"<ID_OF_FLOW_HERE>"}"
  },
  "style": {
    "border": "none",
    "cursor": "pointer",
    "background-color": "#2980b9",
    "color": "#FFF",
    "padding": "4px 4px 4px 4px",
    "border-radius": "5px",
    "display": "=if(indexOf('[$FileLeafRef]', '.vsd') != -1, 'none', if(indexOf('[$FileLeafRef]', '.pro') != -1, 'none', if(indexOf('[$FileLeafRef]', '.msi') != -1, 'none', if(indexOf('[$FileLeafRef]', '.pcm') != -1, 'none', if(indexOf('[$FileLeafRef]', '.pcc') != -1, 'none', if(indexOf('[$FileLeafRef]', '.iso') != -1, 'none', if(indexOf('[$FileLeafRef]', '.cs') != -1, 'none', if(indexOf('[$FileLeafRef]', '.mac') != -1, 'none', if(indexOf('[$FileLeafRef]', '.prt') != -1, 'none', if(indexOf('[$FileLeafRef]', '.csv') != -1, 'none', if(indexOf('[$FileLeafRef]', '.xps') != -1, 'none', 'block')))))))))))",
    "visibility": "=if(((indexOf([$ContentTypeId],'0x0120')) == 0),'hidden', 'visible')"
  }
}
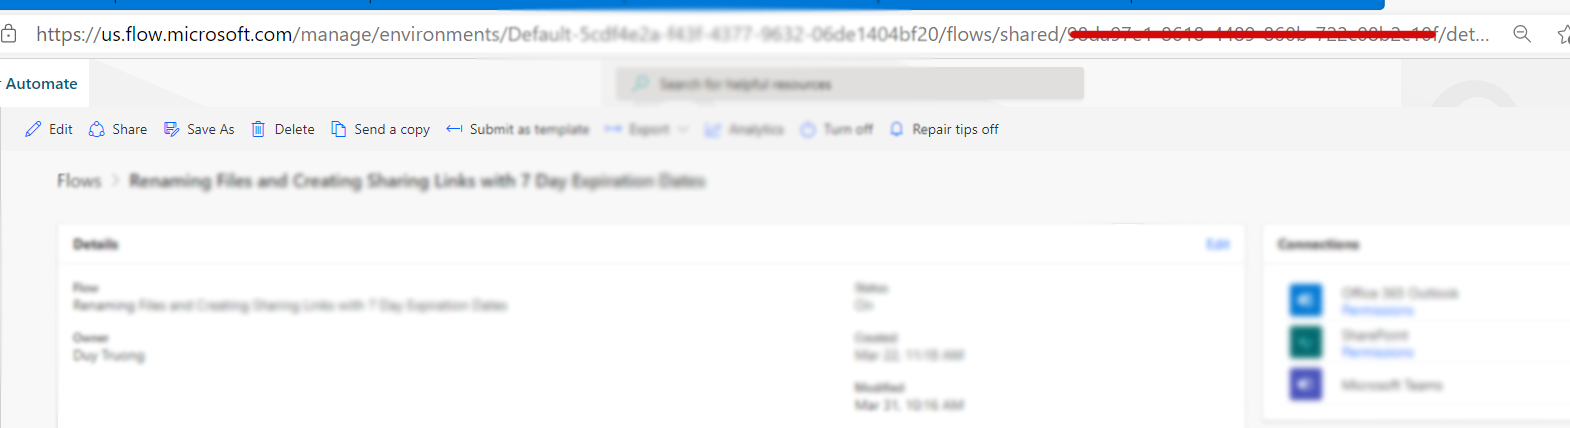
To find the ID of your flow, go to your flow in Microsoft Flow / Power Automate. In the URL, you can find the ID in between Shared and Details. Insert this flow ID into the column formatting JSON.
Conclusion
Document libraries do not have to be boring. With Sharepoint Column Formatting, the applications are endless. From adding character and visual cues to libraries, to implementing buttons, column formatting is an easy tool to add into your workflow that can make document libraries or lists a little more fun and intuitive. In my case, I was able to implement a one click solution to reduce friction in our automated workflow by adding a flow activating button that renders only for supported files. This has greatly increased the user experience for the workflow by preventing wasted time trying to activate flows on unsupported files, only to get a failed flow. Thanks for reading!
For more information on column formatting, here is a link to some documentation from Microsoft: https://docs.microsoft.com/en-us/sharepoint/dev/declarative-customization/column-formatting